
Basic Tweening - Tweening Position
Tweening is one of the handier functions of Ulead GIF Animator 5. "Tweening" is creating or updating the frames "in between" two main frames. You can tween one object to move it across your canvas, or tween the transparency of an object to make it appear to fade in and out. Or both at the same time...
In this tutorial, we will take a basic image, add another object and make it zoom across the canvas.
We will start with this image
![]() and finish
with something like the one below:
and finish
with something like the one below:

Let's get busy...
To start, save the image of the UFO to your hard drive.
Open Ulead GIF Animator 5. Click the Open icon
![]() and
open the UFO gif that you saved on your computer.
and
open the UFO gif that you saved on your computer.
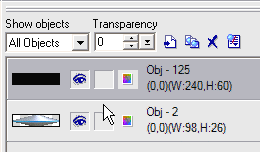
Let's change the canvas size. Click "Edit" then select "Canvas Size..." Set the value to 240 x 60 or so. Leave "Keep aspect ratio" unchecked, and select the sizing reference at middle left as show in the screen shot below. Click OK.

A background would be nice, so you can either make one or add an image you already have. For this tutorial we'll make an easy one.
 Click
the "Insert a blank object" button on the Object Manager. Then go to the
Tool Panel and click the Foreground color and select black, or whatever
color you would like for the background. I chose a dark color, as the UFO
gif has little black edges on it, so looks better on black. Now select the
Fill tool, and click on the workspace. You will now have to move the
background to the bottom of the Object Manager, as it will be covering the
UFO.
Click
the "Insert a blank object" button on the Object Manager. Then go to the
Tool Panel and click the Foreground color and select black, or whatever
color you would like for the background. I chose a dark color, as the UFO
gif has little black edges on it, so looks better on black. Now select the
Fill tool, and click on the workspace. You will now have to move the
background to the bottom of the Object Manager, as it will be covering the
UFO.
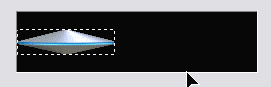 Now
select the UFO in the Object Manager. Select the Pick tool
Now
select the UFO in the Object Manager. Select the Pick tool
![]() and
check "Move active object(s) only." Position the UFO just off the screen
on the left side. Note the dashed line at the left of the canvas shows the
right edge of the UFO object.
and
check "Move active object(s) only." Position the UFO just off the screen
on the left side. Note the dashed line at the left of the canvas shows the
right edge of the UFO object.
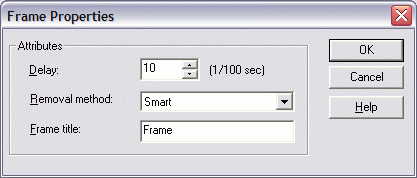
Important Step: Frame Properties. On the Frame Panel, right-click on Frame 1, and then left-click on "Frame Properties." Set them to Frame Delay of 10, Removal Method of Smart, and then click OK. The original UFO image we opened was saved with other software (IrfanView), so we must always check the frame properties and change them if needed. In this case, the delay was 0 and removal method was "Web browser decides." That removal method can result in undesired behaviour in some web browsers.
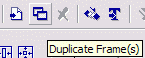 Next,
click the "Duplicate Frame" button on the Frame Panel. Frame 2 should be
showing as selected. With the Pick tool, click and drag the UFO so it's
just off the screen to the right.
Next,
click the "Duplicate Frame" button on the Frame Panel. Frame 2 should be
showing as selected. With the Pick tool, click and drag the UFO so it's
just off the screen to the right.

Now we will use that lovely Tween button
![]() on the bottom of
the Frame Panel. Make sure that the Object Manager still shows just the
UFO object, and no others. When you click the Tween button, a dialog box will appear. We must
set the start frame as 1, and the end frame as 2. We will need to use
"Insert frames" as our frame generation method. We'll try 18
frames, with a frame delay of 10.
on the bottom of
the Frame Panel. Make sure that the Object Manager still shows just the
UFO object, and no others. When you click the Tween button, a dialog box will appear. We must
set the start frame as 1, and the end frame as 2. We will need to use
"Insert frames" as our frame generation method. We'll try 18
frames, with a frame delay of 10.


Click the "Objects" tab and select "Currently selected objects" and "Position." Now click "OK" to set the tweening in motion.
Now time to Optimize and save our animation. Click the Optimize tab in the workspace and find the settings you want. I used Photo 256 for mine. Fewer colors would be okay, too.

Here's another example of what can be done with tweening. In this animation, tweening is used twice - entry from the left, and after a pause, an angled ascent.

I hope you enjoyed this tutorial and learned something from it. Happy Animating!
For my tutorial on Ulead GIF Animator 5's basics, click the following
banner...
![]()
![]()
![]()
![]()