Water Ripples
 Making water
ripples is actually easier than you may expect. It is done with one of the
effects found in the Video F/X menu on the Standard Toolbar, Mirror, which
is found under Camera Lens.
Making water
ripples is actually easier than you may expect. It is done with one of the
effects found in the Video F/X menu on the Standard Toolbar, Mirror, which
is found under Camera Lens.
A little extra... While you can make a passable ripple effect with Mirror alone, a bit of tweaking with something like Adobe's Ocean Ripple distortion effect will make it more realistic. Not everyone will have this filter, however.
You can download Harry's Filters from The Plugin Site and use the Warp filter with the Wonderland feature, set as shown below. X-Wave at 60, Y-Wave at 60, M and D Wave at 0, and Factor set at 255.
Using this filter is optional. Unzip it to the folder you have
configured GA 5 to use for Adobe-compatible filters. If you have not
configured GA 5 for this yet, go to the Standard Toolbar. Click File,
Preferences, and select the Plug-in Filters tab. If you don't have a
folder for Adobe-compatible filters, then create one in Windows Explorer
and extract this file there. Then select this folder in the Preferences
Box. You will have to restart GIF Animator if you have it open. 
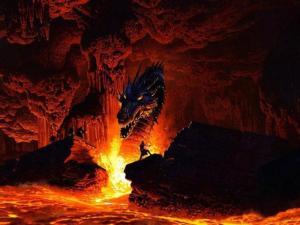
For our tutorial, we're going to make the foreground of this dragon's lair a red, rippled pool... We will also be using our lasso tool for this project, so you'll get some practice with that, too.
Note that if you zoom in to use the lasso tool, make sure there is no scroll bar along the bottom or side of the workspace - this will make it impossible to finish your selection properly if you have to scroll the picture to get to all your picture. You may have to move around or shrink one of the toolbars or panels.
The easiest way is to narrow the object manager panel by putting your cursor just on the edge till the double-headed black arrow appears, then click & drag it over.
The first step is to open this picture, so you will have to right-click on
the picture and save it to disk. Open it in GA 5 by clicking the Open icon
yellow folder![]() on the standard toolbar. Once we have that open, make
sure this is selected in the Object Manager panel. You may want to zoom in
a bit, as we're now going to use the Lasso Tool
on the standard toolbar. Once we have that open, make
sure this is selected in the Object Manager panel. You may want to zoom in
a bit, as we're now going to use the Lasso Tool ![]() . Select the lasso on the tool panel.
. Select the lasso on the tool panel.
 We want to select the
foreground lava goop, so we need to trace around the bottom. Click once at
the bottom left to start, then click at each turn as we trace our way
around to the bottom right, where we finish with a double-click. You
should see something close to this on your screen. Note the dashed lines
where I've traced out our foreground. This is the section we'll be
animating for this sample.
We want to select the
foreground lava goop, so we need to trace around the bottom. Click once at
the bottom left to start, then click at each turn as we trace our way
around to the bottom right, where we finish with a double-click. You
should see something close to this on your screen. Note the dashed lines
where I've traced out our foreground. This is the section we'll be
animating for this sample.
Now go up to the standard toolbar and click the Copy button ![]() . Now click paste
. Now click paste ![]() . This will create a
new object on the object manager panel. This is the object we will need to
make our ripples.
. This will create a
new object on the object manager panel. This is the object we will need to
make our ripples.
 Go to the object manager and click the eye
icon on our main picture so that it is no longer visible in our workspace.
This is what you should now see. Now it's time to go up to the Video F/X
menu and click on that Mirror effect... this box will pop up. We will pick
black for the background, and 5 frames. Click OK.
Go to the object manager and click the eye
icon on our main picture so that it is no longer visible in our workspace.
This is what you should now see. Now it's time to go up to the Video F/X
menu and click on that Mirror effect... this box will pop up. We will pick
black for the background, and 5 frames. Click OK.

 A new box now appears. Down
at the bottom you see a slide and box. Here we will adjust our settings.
Note at the upper left the little control panel. The two diamonds are for
your key frames. The left one is selected, as it shows red. This is our
first key frame. Change the mirror size to 2 at the bottom. Next, click
the right diamond so it is red. Now we can set the mirror size for the end
key frame. We will set this at 6. Make sure the Direction is set at
Horizontal. Then we click OK, and GA 5 generates 5 new frames and objects.
A new box now appears. Down
at the bottom you see a slide and box. Here we will adjust our settings.
Note at the upper left the little control panel. The two diamonds are for
your key frames. The left one is selected, as it shows red. This is our
first key frame. Change the mirror size to 2 at the bottom. Next, click
the right diamond so it is red. Now we can set the mirror size for the end
key frame. We will set this at 6. Make sure the Direction is set at
Horizontal. Then we click OK, and GA 5 generates 5 new frames and objects.
We now have a bunch of black space to get rid of and some tidying to do.
First, delete the first frame. Next, select the new first frame (that
made sense, right?). Select the visible object in that frame. Now click
the magic wand tool ![]() . On your workspace, click in the big black area, making
sure you have the attribute panel set at connected pixels only. Now click
the Selection Options button and select Make Selection Area Transparent.
. On your workspace, click in the big black area, making
sure you have the attribute panel set at connected pixels only. Now click
the Selection Options button and select Make Selection Area Transparent.
Click the Selection Options button again and choose select none. Repeat this process for all five frames and objects.
 Once this is done,
go to the bottom of your object manager and make the main picture visible.
Then click the Synchronize Objects button
Once this is done,
go to the bottom of your object manager and make the main picture visible.
Then click the Synchronize Objects button ![]() and make the
big picture visible in all frames. Make sure the x and y offset an
visibility boxes are checked. The source frame should be 5, with active
objects only, and all frames check boxes selected. Click OK and have a
look... we're getting close to the end!
and make the
big picture visible in all frames. Make sure the x and y offset an
visibility boxes are checked. The source frame should be 5, with active
objects only, and all frames check boxes selected. Click OK and have a
look... we're getting close to the end!
Set your frame delay to about 10/100 of a second and have a look on the preview tab of your workspace. Make any adjustments you need.
If you are wanting to use the Ocean Ripple filter, now is the time. Select a "ripple object" on the object manager. Go to the standard toolbar and click Filter, then select Ocean Ripple. A box will pop up.
 Set the ripple size and
ripple magnitude to 1 or 2, depending on your preference. You can preview
it in the box. Click OK when done. You need to repeat this for every
object you want to apply the effect to.
Set the ripple size and
ripple magnitude to 1 or 2, depending on your preference. You can preview
it in the box. Click OK when done. You need to repeat this for every
object you want to apply the effect to.
If you are using Harry's Filters, refer to the settings given at the top of this page. You would find it on the standard toolbar under Filters, Harry's Filters.
Don't forget to also save as a UGA file in case you want to come back and do more editing.
Speaking of editing, I did come back and add a little extra to the animation... some fiery breath and text.

We're done the tutorial. I hope you were successful and had fun!
For my tutorial on Ulead GIF Animator 5's basics, click the following banner...
![]()
![]()
![]()
![]()