Replacing Objects
Every once in a while, you find yourself wanting to redo an animation. Nothing
extreme, you just want to replace one object. But just adding in a new object via
"Add Image" ![]() or paste requires hiding the original object you're replacing, and then
adding and positioning the new object to every frame in the animation. If that
animation has many frames, that task becomes a large undertaking.
or paste requires hiding the original object you're replacing, and then
adding and positioning the new object to every frame in the animation. If that
animation has many frames, that task becomes a large undertaking.
For example, we've made one of those animated signatures that people seem to enjoy so much...

However, we've decided we want to use a different pen in that animation. Well, using one of the methods noted above will take a very long time, as this animation has 48 frames. There has to be an easier way...
And there is. All you need is a program that can save in either ufo or psd format. Ulead's PhotoImpact will save in both ufo and psd, and programs like Photoshop, Paint Shop Pro, GIMP and CorelDRAW will save in psd format.
 If you have one of those, then all you have to do is configure Ulead GIF Animator 5
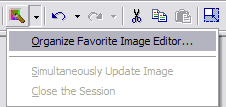
to use one or more of these as an External Image Editor. Just click the little black
down arrow and select "Organize Favorite Image Editor..."
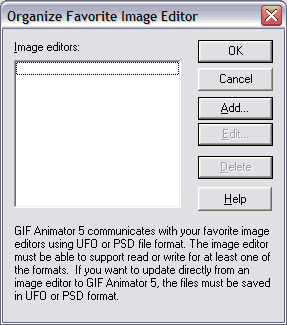
A box will open, and from here you just need to click the "Add" button. Another box will appear.


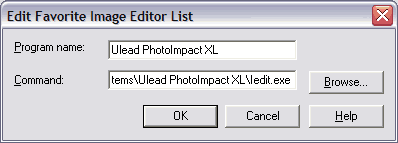
In the Program Name section, just type in the name of the program you will be adding. Next, click the "Browse..." button to navigate to the program's .exe file. The usual place to find them is in C:\Program Files\program name... PhotoImpact's is named Iedit.exe; Photoshop's is Photoshp.exe or Photoshop.exe, depending on the version; Paint Shop Pro is psp.exe. Once you've done that, click OK on those boxes and you are done with this step.
Now to show you how to replace that object...
Note: To replace an object, you must have saved your animation previously in UGA format. The GIF file won't have your original objects in it anymore.
Open the UGA file you want to change. Leave the selected frame at Frame 1. Using the Add Image button ![]() ,
add the image you want to replace that other object with.
,
add the image you want to replace that other object with.
Using the Pick tool, position the new object to exactly where you want it to be.
Next, click the Favorite Image Editor button ![]() -
this will open the editor you have added.
-
this will open the editor you have added.
In the Layer Manager of your image editor, you must now rename the object you want to replace. (How to do this depends on your image editor. If you don't know how to do this with your program, try right-clicking on the layer in the layer manager to look for "rename" or "properties.") Rename it by adding "old" to the name.
Now, rename the object you added using the exact same name the replaced object had. If the object you are replacing was named "Obj - 1" then that is what you should call the new one. If you don't use the exact same name, then this will not work.
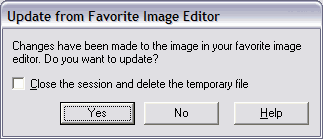
Now hide the old object/layer so it's no longer visible. Then just "Save" and GIF Animator 5 will reappear with this box:

Click "Yes" to bring the updated animation into GIF Animator 5. It's up to you if you want to check the box to close the session and delete the file.
Have a look at the changed animation. You may have to change the canvas size somewhat if the new object was bigger or smaller than the original. That can be done by clicking "Edit, Canvas Size..."

If everything looks okay, save your changed animation in UGA format and close program you were using as the external editor.
We're done!
I hope you enjoyed this tutorial and learned something from it. Happy Animating!
For my tutorial on Ulead GIF Animator 5's basics, click the following banner...
![]()
![]()
