
Smile!
Making a simple smiley
 Making a simple smiley is fairly easy with GA 5. All that is required a few basic tools:
Paintbrush tool ![]() , Pick tool
, Pick tool
![]() , the Selection tools
, the Selection tools
![]()
![]()
![]() ,
and the Fill tool
,
and the Fill tool ![]() .
.
We will also cover the Attribute Toolbar for the paintbrush, how to combine objects, and ways to use the Selection tools. I will also show you a few other tricks throughout this tutorial - some of these steps may not be the quickest way to do some things, but some of you may learn something new. Learning is a good thing - that's why you're here!
If you haven't yet read the tutorial on GIF Animator 5's Basics, you may want to give it a read or two before you start this one.
Now on with our animation!
 We will be making a 100 x 100 pixel smiley. To make things a bit easier, we will make our canvas a bit bigger. This way
we aren't doing minute moves with the mouse to get our face in the right place. You will see what I mean shortly.
We will be making a 100 x 100 pixel smiley. To make things a bit easier, we will make our canvas a bit bigger. This way
we aren't doing minute moves with the mouse to get our face in the right place. You will see what I mean shortly.
To start, we'll open a new blank animation by clicking the New ![]() button on the Standard toolbar. This will bring up a dialog box appropriately called New. Here we will set our canvas size to 120 x
120 pixels. This can either be typed in the Width and Height boxes, or selected from the drop-down menu, as 120 x 120 is one of the presets.
button on the Standard toolbar. This will bring up a dialog box appropriately called New. Here we will set our canvas size to 120 x
120 pixels. This can either be typed in the Width and Height boxes, or selected from the drop-down menu, as 120 x 120 is one of the presets.
Note the two icons to the right of the drop-down menu. You can click on these to add a preset (the bigger one on the left) or delete a preset (the smaller one on the right).
We will select the Fully transparent option at the bottom of the box.

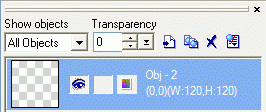
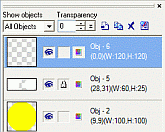
Our next step is to make the face for our smiley person. Click the Insert Blank Object button on the Object Manager. Our Object Manager panel should now appear like the one below:
 We will now select the Paintbrush tool from the Tool Panel. We will then pick a nice yellow by clicking the foreground palette on the Tool Panel.
Whatever shade of yellow you like is fine.
We will now select the Paintbrush tool from the Tool Panel. We will then pick a nice yellow by clicking the foreground palette on the Tool Panel.
Whatever shade of yellow you like is fine.
We must now set the Attribute Toolbar as follows: Select the circular shape, set the size at 100 (this is the maximum size¹),
with transparency and soft edge set to 0. Click the squiggly line button - this is the freehand mode. Lastly, make sure the "Allow painting on
transparent areas" box is checked.
![]()
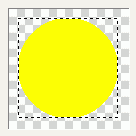
Next place the paintbrush in approximately the middle of your workspace and click. Don't worry if it's not perfectly centered. We can fix that in a moment. As long as the complete circle shows, we're doing fine.
We are going to give our smiley some eyeballs now. We will start with the whites.
- Go back to the Attribute Toolbar and change the size of the brush to about 25.
- Click the Insert Blank Object button again.
- Next, change the foreground color on the Tool Panel to white.
- Once these steps are done, click with the paintbrush on the workspace.
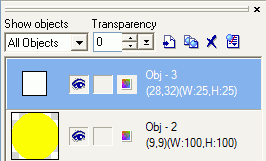
 We will now have the white of one eye. Our Workspace and Object Manager should now look like the images on the right:
To make the other eye, we are going to click the Duplicate Object button on the Object Manager.
![]() The workspace will look like there is still one eye - but the new one is in the exact place as the original, as a look at the Object Manager will
prove. Switch to the Pick tool and click and drag the eyes in the Workspace so they appear to be spaced appropriately. Don't worry if one is
a wee bit higher or lower than the other - we will fix that next.
The workspace will look like there is still one eye - but the new one is in the exact place as the original, as a look at the Object Manager will
prove. Switch to the Pick tool and click and drag the eyes in the Workspace so they appear to be spaced appropriately. Don't worry if one is
a wee bit higher or lower than the other - we will fix that next.
![]() Now that you have the eyes spaced apart to your liking, we will use one of several ways to position objects: The Alignment buttons on
the Pick Tool's Attribute Toolbar. Click the Center Vertically button as shown here. This will put the eyes in a funny place, but don't worry about
that. That too we will fix. At least now they are perfectly level with each other.
Now that you have the eyes spaced apart to your liking, we will use one of several ways to position objects: The Alignment buttons on
the Pick Tool's Attribute Toolbar. Click the Center Vertically button as shown here. This will put the eyes in a funny place, but don't worry about
that. That too we will fix. At least now they are perfectly level with each other.
Before we put the eyes back where they look good, select both eyes on the Object Manager. Click on one, then hold down the Ctrl key and click on
the other. Now click the Object Manager Commands ![]() button. This will bring up this menu:
button. This will bring up this menu:
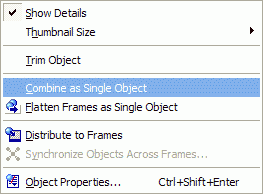 Select the Combine as Single Object command, and watch our two eyes become one object. We can now easily position the eyes
vertically where we want them.
Select the Combine as Single Object command, and watch our two eyes become one object. We can now easily position the eyes
vertically where we want them.
Next we will get everything centered horizontally. With the eyes selected on the Object Manager, and the Pick tool selected, click the Center Horizontally button on the Attribute toolbar. Now select the face on the Object Manager and center it horizontally, too.
Now we will clean up the extra space around our face. This is done by selecting the face on the Object Manager (it should already be selected if you are following along here). Next, on the Standard Toolbar, click "Edit" and select "Crop Canvas." Your Workspace should now show all the extra space gone, and we have a 100 x 100 pixel image.
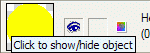
![]() Now for a precautionary step... go to the Object Manager and click the Lock on both objects. It's the one just to the right of the 'eye' icon.
When this is turned on, you are prevented from accidentally moving these locked objects in the Workspace. This isn't a necessary step,
but if you have the habit of accidentally moving the wrong object, this helps.
Now for a precautionary step... go to the Object Manager and click the Lock on both objects. It's the one just to the right of the 'eye' icon.
When this is turned on, you are prevented from accidentally moving these locked objects in the Workspace. This isn't a necessary step,
but if you have the habit of accidentally moving the wrong object, this helps.
Now we need to make a couple black dots for the eyes...
 To make the black dots for the eyes, we will select the paintbrush tool again. Set the size of the brush to 10 on the Attribute Toolbar. On the
Tool Panel, select black as the foreground color. Now we need to go to the Object Manager and make another blank object. Once you have made the
blank object, make sure it is at the top of the Object Manager. If it's not, click and drag it to the top.²
Now it's time to make a black dot with the Paintbrush. Click on the workspace with the Paintbrush. Don't worry that
it doesn't look round. At that size, the outline GA 5 puts around active objects on the Workspace makes it look funny. If you zoom in
To make the black dots for the eyes, we will select the paintbrush tool again. Set the size of the brush to 10 on the Attribute Toolbar. On the
Tool Panel, select black as the foreground color. Now we need to go to the Object Manager and make another blank object. Once you have made the
blank object, make sure it is at the top of the Object Manager. If it's not, click and drag it to the top.²
Now it's time to make a black dot with the Paintbrush. Click on the workspace with the Paintbrush. Don't worry that
it doesn't look round. At that size, the outline GA 5 puts around active objects on the Workspace makes it look funny. If you zoom in ![]() with the magnifying glass, it will look better.
with the magnifying glass, it will look better.
To make the second black dot, we're going to do the same as we did with the eye white. Go to the Object Manager and click the Duplicate Object button. Change to the Pick tool and position both where you want them for the start of your animation. This will be easier if you have zoomed in with the magnifying glass on the Tool Panel.
Now for the mouth. We could try to do a nice smile freehand with the mouth and hope it looks nice. I don't know about you, but I can't draw a nice, evenly curved smile. So we are going to do it the hard way...
- Select the paintbrush, and set the size to 70.
- Select black as the foreground color on the Tool Panel.
- Go to the Frame Panel and click the Add Frame
 button. (We're doing this on a blank frame as we
don't need the other objects interfering in what we're about to do.)
button. (We're doing this on a blank frame as we
don't need the other objects interfering in what we're about to do.) - On the Object Manager, add a new blank object. Make sure it's at the top.
- Click in the middle of the Workspace with your Paintbrush.
- Select the Pick tool and go to the Attribute Toolbar. Click the
Center Both
 button.
 - Select the Ellipse selection tool
 on the Tool Panel. Make sure the "Equal
width and height" box is checked.
on the Tool Panel. Make sure the "Equal
width and height" box is checked. - Zoom in
 and make your workspace fairly
large.
and make your workspace fairly
large. - Now the tricky part: Move the Ellipse tool over your workspace. Look
at the bottom left of your screen on the Status Bar. You should see
the x and y co-ordinates
") there. Once
the co-ordinates read '16, 16' click and drag over the big black dot
until you have a circle just a hair smaller than the black one. The
status bar should read
there. Once
the co-ordinates read '16, 16' click and drag over the big black dot
until you have a circle just a hair smaller than the black one. The
status bar should read -(84, 84) W:68 H:68") . Now release the mouse button³.
. Now release the mouse button³.
Your workspace should now look like this:
 Now click the Selection Options
 ![]() button on the Attribute Toolbar. Select "Make Selection Area Transparent." Click it again and select "None." This should
give you a black ring in your Workspace.
button on the Attribute Toolbar. Select "Make Selection Area Transparent." Click it again and select "None." This should
give you a black ring in your Workspace.
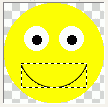
 Now we'll delete the part of the ring we don't want, leaving us with the smile we do want. You may want to make all the other objects
visible in this frame so you can tell where to crop. Click in the Show-Hide check box on the Object Manager to make the other objects visible.
When you're done, make sure the black ring object is still selected as the Active object.
Now we'll delete the part of the ring we don't want, leaving us with the smile we do want. You may want to make all the other objects
visible in this frame so you can tell where to crop. Click in the Show-Hide check box on the Object Manager to make the other objects visible.
When you're done, make sure the black ring object is still selected as the Active object.
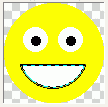
 Select the Rectangle selection tool. Uncheck the "Equal width and height" check box. Click and drag over the area of the black ring you
want to delete. Then click the Selection Options button and select "Make Selection Area Transparent," then click it again and
select "None." This will give you a smile that looks pretty close to this:
Select the Rectangle selection tool. Uncheck the "Equal width and height" check box. Click and drag over the area of the black ring you
want to delete. Then click the Selection Options button and select "Make Selection Area Transparent," then click it again and
select "None." This will give you a smile that looks pretty close to this:
Now for the rest of the mouth. On the Object Manager, insert a new blank object. Select the Paintbrush, and change the brush size to 1.
Change the line type to Straight lines ![]() .
.
On the Workspace, click once with the Paintbrush at the left corner of the mouth. Then click once more at the right corner of the mouth. You should now have a straight black line across the top of the smile.
On the Object Manager, insert a new blank object. Select the Magic Wand ![]() selection tool. On the Workspace, click in the middle of the smile. On the Tool Panel, select the Fill Tool
selection tool. On the Workspace, click in the middle of the smile. On the Tool Panel, select the Fill Tool
![]() , and change the foreground color to white. Click with the Fill Tool in the smile.
You will now have a white area in the middle of the smile. Right-click on the white smile and select "Trim Object(s)."
, and change the foreground color to white. Click with the Fill Tool in the smile.
You will now have a white area in the middle of the smile. Right-click on the white smile and select "Trim Object(s)."
 Now we will make the teeth. Insert a new blank object. Select the Paintbrush and change the foreground color to black. Make sure the brush size is still 1,
and that "Straight lines" is selected. Now make some straight lines where you want teeth to be. Note that we still have the selection area active
from using the Magic Wand. This will keep us from making lines outside our mouth area.
Now we will make the teeth. Insert a new blank object. Select the Paintbrush and change the foreground color to black. Make sure the brush size is still 1,
and that "Straight lines" is selected. Now make some straight lines where you want teeth to be. Note that we still have the selection area active
from using the Magic Wand. This will keep us from making lines outside our mouth area.
 You don't have to make the teeth look like these ones - make what you like...
Once you are done making the teeth, switch to any of the selection tools. Click the Selection Options button and select "None." Switch to the Pick Tool.
Now we can animate this smiley!
On the Frame Panel, select the first frame. On the Object Manager, click the Show-Hide check boxes to make visible all the objects you want for the first frame. I'm going to add just the flat mouth. Use the Pick Tool in the Workspace to click and drag objects as desired.
Once you're done the first frame, click the Duplicate Frame button on the Frame Panel to make the second frame. Position and show the objects you want here.
Do this for all the frames you want to add. When you have all your frames made, adjust the timing of each frame to your liking. You can double click on the frame to bring up the Frame Properties box.
I have made the following:


You can see on the images above the frame delays used for this smiley. You may also note I named some of the frames for fun.
All that's left to do is save this guy. First, let's save this as a UGA file. On the Standard Toolbar, click "File," then "Save As..." and select "As UGA File..." Saving in UGA format preserves all the objects we worked so hard to make! We can open the UGA file again later and make other smileys with these objects.
Before we save this as a GIF, we need to optimize it. Click the Optimize tab on the Workspace. I used these settings:
![]()
Note I have made a preset called "32 w/comment." This means the comment block is kept when optimized. You can use the "Photo 32" preset, and change the Matte to "none" as I have above. For this file, I end up with a file size of 1,931 bytes. Just under 2 Kb, which is quite small.
Click the Preview tab and check how it plays. If you need to adjust the frame delay, go back to edit mode and do that. It may take a bit of switching back and forth from Edit to Preview to get the timing down just right.
Once you are satisfied with everything, go to the Optimize tab and click the Save button at the bottom right.
We're done the tutorial. I hope you were successful and had fun!
Footnotes
1. This maximum is not an absolute. If you want the object bigger, or even distorted, we can do that by double-clicking the object to bring up the Object Properties box. Click the Position and Size tab and enter new values in the height and/or width boxes. If you do not want the aspect ratio to change, check the "Keep aspect ratio" box. This keeps your circle from becoming an oval. If you want an oval, then make sure it's not checked! Back to where you were...
2. When you Insert a New Blank Object, GA 5 always places the new object just above the object last selected on the Object Manager. You may need to drag the object to the top of the Object Manager to work on it if it's not already at the top. Back to where you were...
3. This x-y co-ordinate is dependent on you following EXACTLY what I'm doing on the tut... Otherwise, your selection with the Ellipse tool may be off. The x-y co-ordinate of the black dot should read "15, 15" on the Object Manager... Zooming in big to do this helps, too.
There is another way to delete the middle of the black dot...
- Add a new blank object.
- Select the Paintbrush, change the brush size to 68.
- Pick any color that isn't close to black on the Foreground palette.
- Click on the workspace and make a dot.
- Switch to the Pick Tool, and click the Center Both button on the Attribute Toolbar.
- Select the Magic Wand, making sure "Connected pixels only" is checked. Now click on your new dot with the Magic Wand.
- On the Object Manager, select the big black dot.
- Click the Selection Options button and click on "Make Selection Area Transparent." Then click it again and select "None."
- Delete the second dot we just made on the Object Manager.
We should now have the same desired result - an 80 pixel circle with a line width of 1 pixel. Back to where you were...
For my tutorial on Ulead GIF Animator 5's basics, click the following banner...
![]()
![]()
![]()