
Tool Panel & Attribute Toolbars | Ulead GIF Animator 5 Basics
 There
are actually several attribute toolbars. Which one is displayed depends on the
tool you've selected from the Tool Panel. The Tool Panel is used to compose
and edit your frames in the Workspace. There is
also an attribute toolbar for the Optimize tab in the Workspace section.
There
are actually several attribute toolbars. Which one is displayed depends on the
tool you've selected from the Tool Panel. The Tool Panel is used to compose
and edit your frames in the Workspace. There is
also an attribute toolbar for the Optimize tab in the Workspace section.
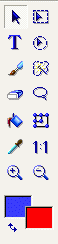
Click on a tool on the tool panel image at the right to read the description. Click your browser's BACK button to return here.
Very Important Note: Whenever you modify an object - with the exception of
changing it's location with the Pick tool - you are modifying how it will look in
all frames. If you are going to change the size, erase parts, paint on it, or otherwise
modify it for only some of the frames, duplicate it first, and modify the duplicate.
Use the Duplicate Object button ![]() on the Object Manager panel.
on the Object Manager panel.
![]() The first tool is the Pick tool. This looks like a standard Windows cursor and
is located at the top left of the tool panel. This tool lets you select and
move objects in the frame. Using the pick tool you can click on the object
desired in your workspace, and then drag it to whatever position you wish. You
can see the x-y axis for the object updated in the Object Manager panel as you
drag the object around.
The first tool is the Pick tool. This looks like a standard Windows cursor and
is located at the top left of the tool panel. This tool lets you select and
move objects in the frame. Using the pick tool you can click on the object
desired in your workspace, and then drag it to whatever position you wish. You
can see the x-y axis for the object updated in the Object Manager panel as you
drag the object around.
Below is the attribute toolbar for the pick tool. At the left you see four arrows under the heading Order. This lets you move the object up one, down one, up to the very top or down to the bottom. The top object is the one that will overlap all others, like the top sheet of paper in a big pile of papers. So if you want an image as a background, move it to the bottom. If you want it to be in front of all the other objects, move it to the top.
![]()
Next is the Alignment section. You can align the object to the far left, far right, top, bottom, centered horizontally, centered vertically, or in the absolute middle. This can be very useful.
Clicking the Properties button will pop up the Object Properties window. From this window you can rename the object, choose if it is shown in the current frame, adjust the level of transparency, apply shadow effects, adjust the position of the object in that specific frame, lock the object's position (useful if you don't want to accidentally move it) and adjust the size of the object.

![]() The Text tool is used to add a text object to your frame. Click the text tool
icon, place your cursor over the image in your workspace, and left-click. A
text entry box will open, and you may add and edit your text here. Clicking
"Preview" will add the text to your image so you may see it. If you
click cancel, the text will be removed, or if you are editing existing text,
the changes will be undone. Once you've entered your text, you may right-click
over the image in your workspace and select "Edit Text" or use the
text attribute toolbar, shown below.
The Text tool is used to add a text object to your frame. Click the text tool
icon, place your cursor over the image in your workspace, and left-click. A
text entry box will open, and you may add and edit your text here. Clicking
"Preview" will add the text to your image so you may see it. If you
click cancel, the text will be removed, or if you are editing existing text,
the changes will be undone. Once you've entered your text, you may right-click
over the image in your workspace and select "Edit Text" or use the
text attribute toolbar, shown below.
Select font and font size as you would in any other program. Clicking on color gives some different options. Try them all out. (NOTE: The "Advanced text color effect" option applies only to users of Ulead PhotoImpact. UGA 5 supports only a text object with one color or with a two-color gradient fill. When the text object is edited in PhotoImpact and a multi-colored gradient fill or other types of fill (texture) are used, this option will be selected. When this is selected, you cannot adjust the text attribute of the text object inside GIF Animator. However, you can still edit the text object's content.)
![]()
NOTE: You may also paste text you've copied from another program. Click the cursor in the text entry area and press "Ctrl V" on the keyboard. Using the Paste button will not work. To copy text from the Text Entry Box, highlight the text and use the keyboard shortcut "Ctrl C."
Once you've entered your text, you may position it with the Pick tool or the Text tool. If you use the text tool, make sure you put the cursor directly over some text so the I-beam disappears, otherwise the Text Entry Box will open again.
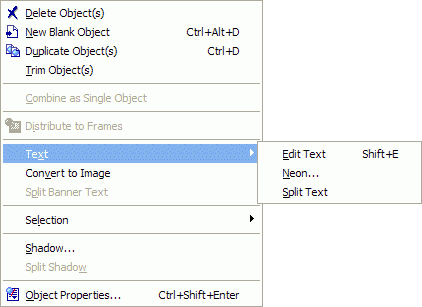 If
you right click over the workspace image, you can access some additional
options.
If
you right click over the workspace image, you can access some additional
options.
"Neon..." will add a neon glow around the text. You can select the color and width of the glow. If you select "transparent," the glow will remain and the text will disappear. For an animated neon glow, see the topic "Add Banner Text" under Frame Panel.
"Split Text" will do just that. It will convert each character of
the text into an individual object. If you performed Split Text to the text
object, "Animation" you would get 9 new objects: "A,"
"n," "i," "m," etc. In conjunction with the
"Distribute To Frames" button (see Standard
Toolbar), you can make animated text like this:
![]() (See also the Frame Removal Method tutorial.)
(See also the Frame Removal Method tutorial.)
Sometimes when you try applying an effect to a text object, you will get a pop-up message saying the "object is a text or path object, convert to image first." Right-click on the image and the menu above will appear. Click on "Convert to Image." You may then proceed with what you were trying to do. However, you can no longer edit the object as text... so you may want to copy the text object, then convert the copy to an image.
To add a shadow to your text, right-click on the text object and click on "Shadow." A pop-up box will open, and you may apply the shadow effect. There are several settings to play with here - experiment!
As you can see, you can do lots with text. Poke around and have some fun!
![]() The Paintbrush tool is simple yet quite useful. The color used is the
foreground color shown on the Tool Panel. You select a square or circular
brush, with a brush size from 1 to 100 pixels in size. Transparency lets you
adjust the opacity of your "paint" from 0 (non-transparent) to 99
(almost invisible). Soft edge sets the "fuzziness" of your brush, 0
being solid edged or non-fuzzy, 100 giving an airbrush-like effect.
The Paintbrush tool is simple yet quite useful. The color used is the
foreground color shown on the Tool Panel. You select a square or circular
brush, with a brush size from 1 to 100 pixels in size. Transparency lets you
adjust the opacity of your "paint" from 0 (non-transparent) to 99
(almost invisible). Soft edge sets the "fuzziness" of your brush, 0
being solid edged or non-fuzzy, 100 giving an airbrush-like effect.
![]()
Two choices are in the Line section. The squiggle is for free-hand painting. Put your cursor where you want to paint, left-click and hold while moving the mouse. The diagonal straight line makes, well, a straight line. Click where you want the line to start, move to where you want the line to end and click once more. The little check box is self explanatory. The Trim button trims any excess empty (transparent) space from the edges of any object, not just one you have drawn.
![]() The Eraser tool functions just like the Paintbrush tool described above,
except it erases. See Paintbrush Tool above for details. The attribute panel
is shown below.
The Eraser tool functions just like the Paintbrush tool described above,
except it erases. See Paintbrush Tool above for details. The attribute panel
is shown below.
![]()
It is identical to the paintbrush attribute panel except it does not have the check box for painting on transparent areas.
![]() The Fill tool is just like the one in MS Paint. It will fill an area of one
color (including a transparent area in a gif) with another color. The color
used is the foreground color shown in the Tool Panel.
The Fill tool is just like the one in MS Paint. It will fill an area of one
color (including a transparent area in a gif) with another color. The color
used is the foreground color shown in the Tool Panel.
![]()
The similarity setting (which defaults at 32) determines the degree of similarity in color between the selected pixel and its adjacent pixels. The lower the value, the closer in color to the selected color you're clicking on will be changed. If you had a gif with 256 shades of grey, and wanted to change only one of those individual colors, you would set the similarity to 0. The default will usually work fine.
As with the paint and eraser tools, transparency sets the opacity of the color fill. Select Anti-aliasing to smooth out the rough edges of the object (recommended).
The "Fill connected pixels only" prevents all pixels of that color from being changed - it will change only the pixels of that color that are touching each other. For example, in our Smiley Guy animation, if we wanted to change the color of one of his teeth to green, we would check this box. If we unchecked this box, when we use the fill tool all the white areas in that object (all his teeth) would become green.
![]() The Eyedropper tool lets you to select a drawing color (the foreground color)
visually by clicking on a color in the workspace, just like in MS Paint. Your
selected color will be used for the brush when you use the Paintbrush or Fill
Tool. The Attribute Toolbar displays the RGB (red, green and blue), HSB (hue,
saturation and brightness), and Mask values of the color beneath the
eyedropper. (The higher the mask value, the more visible the image is.)
The Eyedropper tool lets you to select a drawing color (the foreground color)
visually by clicking on a color in the workspace, just like in MS Paint. Your
selected color will be used for the brush when you use the Paintbrush or Fill
Tool. The Attribute Toolbar displays the RGB (red, green and blue), HSB (hue,
saturation and brightness), and Mask values of the color beneath the
eyedropper. (The higher the mask value, the more visible the image is.)
![]()
![]()
![]()
![]()
![]() Selection Tools: Rectangle, Ellipse, Magic Wand, and Lasso. These are very
useful tools once you become familiar with them.
Selection Tools: Rectangle, Ellipse, Magic Wand, and Lasso. These are very
useful tools once you become familiar with them.
It is important to remember to use the Object Manager Panel or Pick Tool to select the specific object to work on! What you see in the workspace is what is in the currently selected frame, which may be several objects. Make sure you have selected the object you wish to work on.
Lastly, if you want to redo a selection that you messed up, click the handy Undo button on the Standard Toolbar.
![]()
Similarity refers to how close in colour the selection will be. This applies to the Magic Wand tool. The default is 32. A lower value will select pixels very close in color to the one you selected, while a higher value will select a larger range of shades of that colour. Experiment with the similarity setting to get an idea of how it works. This is greyed out on the other selection tools.
 Soft
edge applies to all selection tools except the magic wand. This setting will
give a "fuzzy" edge to your selection. The maximum value is 150. A
setting of 0 gives no soft edge. The soft edge will extend past the area you
selected, resulting in a larger image than you may be expecting.
Soft
edge applies to all selection tools except the magic wand. This setting will
give a "fuzzy" edge to your selection. The maximum value is 150. A
setting of 0 gives no soft edge. The soft edge will extend past the area you
selected, resulting in a larger image than you may be expecting.
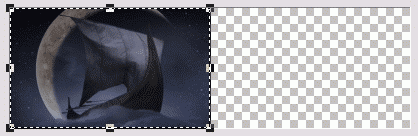
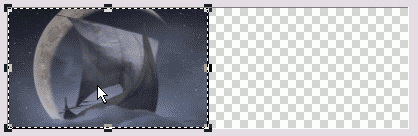
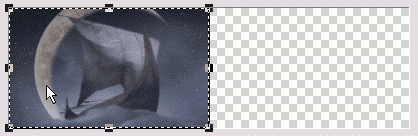
In the example shown here, an elliptical selection was made of a photo with the soft edge set at 40. The selection was copied and pasted over a white background object.
Anti-aliasing smoothes the rough edges of the selection. It's usually best to leave this option checked.
Connected pixels only applies to the magic wand. When checked, this will select only similarly coloured pixels that are adjacent to each other. If not checked, it will select all pixels of that colour in the whole frame.
Equal height and width applies to the rectangle and ellipse tools only. When checked you will get a square or a circle.
 The
Selection Options button reveals the menu to the right.
The
Selection Options button reveals the menu to the right.
- None will deselect any current selection.
- All selects the entire object.
- Invert will reverse your current selection.
- Non-transparent will select all areas of the object that are not transparent.
- Make Selection Area Transparent makes all areas within your selection transparent (a very useful function - you can use it to make an existing gif with a coloured background have a transparent background when used in conjunction with the magic wand tool).
- Load Selection lets you use an image file as a selection. When you load the image into UGA 5, a selection is created using the outline of the image opened. If you want to reposition the selection, use one of the Selection tools.
Rectangle Tool. Use this tool to make a rectangular selection on your image. When you select this tool, the cursor changes to a cross. Check "Equal height and width" if you want to make your selected area a square. Click and hold and drag on the image until you have created the desired selection area.
Ellipse Tool. Use this tool to make a circular or elliptical selection. Check the "Equal height and width" box to make a circular selection.
Magic Wand Tool. This tool lets you select an area based on color. Select this tool from the Tool Panel, and then click on a color in the image. On the Attribute Toolbar, check "Connected pixels only" if you want to select only the adjacent pixels of the color where the mouse was clicked.
Lasso Tool. Use this tool to create irregularly shaped selection areas on your image. To use it, select this tool from the Tool Panel and then click on the object to create connecting points. If you wish to trace around an area, click and hold. Double-click at the end of your selection to connect the end point with the starting point.
![]() The Transform tool has two functions. It lets you resize
The Transform tool has two functions. It lets you resize ![]() or rotate
or rotate ![]() the selected object. You may want to duplicate the object first using the
Duplicate Object button
the selected object. You may want to duplicate the object first using the
Duplicate Object button
![]() on the Object Manager panel, and transform the
duplicate.
on the Object Manager panel, and transform the
duplicate.
![]()
In the examples that follow, I have transformed a duplicate of the object with the Resize function.
Resize
![]() lets you grab the object at one of the little black nodes at the corners or
middle of the edges and freely resize the object. If you want to keep the
proportions the same, hold the Shift key when you resize.
lets you grab the object at one of the little black nodes at the corners or
middle of the edges and freely resize the object. If you want to keep the
proportions the same, hold the Shift key when you resize.
 Using
the Shift key will let you do a resize and rotate together if you drag
one of the middles nodes over and past the node on the opposite side. Your
canvas will have to be twice the width (or height) of your object to do this
easily.
Using
the Shift key will let you do a resize and rotate together if you drag
one of the middles nodes over and past the node on the opposite side. Your
canvas will have to be twice the width (or height) of your object to do this
easily.
Put the cursor over the middle node on the left side until the cursor changes to the two-headed arrow. Hold the Shift key, and click and drag the left side all the way to the right side of your canvas. The result will look like this:
You may have to fine tune the size to what you you desire. You can click and drag one of the nodes, or change the Object Properties in the Object Manager panel.
You can make a mirror image of an object using the resize function. To do
this, you'll first want to duplicate the object using the Duplicate Object
button ![]() on the Object Manager panel. We now have two possible
options, one of them using the Ctrl key.
on the Object Manager panel. We now have two possible
options, one of them using the Ctrl key.
 Using
the Ctrl key will flip the object over on itself, the centre of the
object being the axis. As before, put the cursor on a middle node. If you were
mirroring vertically, you would use the middle node on the top or bottom. In
this example, we're mirroring horizontally, so we'll use the left node. (The
right node can be used too, but you would drag it to the left.)
Using
the Ctrl key will flip the object over on itself, the centre of the
object being the axis. As before, put the cursor on a middle node. If you were
mirroring vertically, you would use the middle node on the top or bottom. In
this example, we're mirroring horizontally, so we'll use the left node. (The
right node can be used too, but you would drag it to the left.)
Hold down the Ctrl key, and click and drag the left middle node over to the right edge of the object. This gives us a mirror image of the object. The mirror image is on top of the original object. Again, you may have to adjust the size of the object to your liking.
The second option also mirrors, but you drag one edge over the opposite edge. In this example, we're mirroring horizontally again. Your canvas will have to be twice the width (or height if mirroring vertically) of the object you're using. Click and drag the left side node all the way to the right side of the canvas. The result is shown below.
Experiment with the Transform tool and see what you can come up with...
Rotate
![]() lets you rotate the object, either freely by using the nodes on the corners of
the rotation box, or by degree by using the Attribute Toolbar. To use the
toolbar, type in the degree and then click either the counter clockwise or
clockwise button. Note that if you want to use this object in its original
non-rotated state elsewhere in your animation, you should duplicate the object
and rotate the copy instead. Duplicate the object using the Duplicate Object
button
lets you rotate the object, either freely by using the nodes on the corners of
the rotation box, or by degree by using the Attribute Toolbar. To use the
toolbar, type in the degree and then click either the counter clockwise or
clockwise button. Note that if you want to use this object in its original
non-rotated state elsewhere in your animation, you should duplicate the object
and rotate the copy instead. Duplicate the object using the Duplicate Object
button ![]() on the Object Manager panel.
on the Object Manager panel.
The Reset Center button moves the rotation point back to the center of the object. When the Transform Tool is set at Rotate, a rotation point appears at the center of the object. You may click and drag the center to change the reference point around which the object will rotate.
![]()
![]() View tools - Actual View (resets your view to actual size), Zoom In and Zoom
Out. Quite basic tools that require no additional explanations.
View tools - Actual View (resets your view to actual size), Zoom In and Zoom
Out. Quite basic tools that require no additional explanations.
![]() The Color tool. Clicking on the left rectangle lets you pick the background
color. The right rectangle picks the foreground color. A menu pops up to let
you choose your color. Clicking the little dual arrow at the bottom left
transposes the background and foreground colors.
The Color tool. Clicking on the left rectangle lets you pick the background
color. The right rectangle picks the foreground color. A menu pops up to let
you choose your color. Clicking the little dual arrow at the bottom left
transposes the background and foreground colors.

On the bottom right corner of the Ulead Color Picker there is a box showing the Hex value of the color - if you know the hex value of the color you want, you can enter that here and click OK.
The foreground color is the color that is used by the Paintbrush tool and the Fill tool. The background color also serves as the matte for a transparent frame. The matte (background color) will be used when using filters and video special effects.


![]()
![]()
![]()