Frame Removal Method
The one thing most people don't even think about when making an animation with Ulead GIF Animator 5 (GA 5) is the Frame Removal Method. They just make their animation, save it in GIF format (and hopefully UGA format as well!) and forget about it... But knowing what the frame removal setting does can be very handy.
GA 5 usually sets this up nicely for us by default, with it's "Smart" removal method setting. It usually determines nicely what removal method to use in the GIF file created. Once you have saved your animation in GIF format, you can open the GIF file to examine what GA 5 used for the removal method for each frame.
The Frame Removal Method tells the web browser playing the GIF animation how to remove a frame in preparation for displaying the next frame. It's like the web browser saying, "Okay, I've shown that frame and want to show the next one, how do I remove it?"
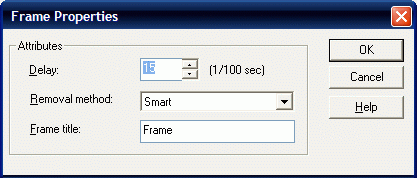
 The Frame Removal Method for a frame is found by checking the Frame Properties for a frame. This can be done by
double-clicking the frame in the Frame Panel.
The methods available are:
- Smart - When GA 5 saves your animation in GIF format, it will automatically choose one of two methods - Do Not Remove or To Background - depending on the frames. Smart is the default setting when you are making a new animation, and is usually the best to choose.
Note that if you have opened a previously saved GIF file, the Removal Method for each frame will be whatever was used by the software that created it.
- Do Not Remove - The frame is not removed and any subsequent images are displayed over it.
- To Background - Removes the frame and replaces it with the Web page background color. If frames overlap evenly, then a smooth transition effect occurs.
- To Previous State - Removes the frame and replaces it with the frame preceding it. If all the frames in the sequence are set to this, then a smooth transition from one frame to the next happens regardless of how they are overlapped.
Note: The To Previous State option may not be supported by some Web browsers, and is not recommended. - Web Browser Decides - The Web browser playing the animation removes the frame. How this is done varies from browser to browser and is not recommended.
Sometimes we have to change the Removal Method... so it's good to know how it works to do it correctly. A couple examples follow...
Example 1
You've opened and edited a GIF file - you removed the background color (with the Magic Wand) to make it transparent, but now it looks a wee bit strange...
Original Background Removed The gophers in the animation on the right are leaving "ghost" images of the previous frames behind! Why?
If we examine the removal method for all those frames, it's set at "Do Not Remove." As a result, the next frame is being drawn over the other one. Remember, when you create a brand new animation in GA 5, the "Smart" setting is used. But when you open a GIF animation, the removal method will be whatever was used when that animation was saved originally.
If we set the removal method for all frames as "To Background" or use GA 5's "Smart" setting, it will then be displayed as we want.
That looks a lot better.
Example 2
We can take advantage of the "Do Not Remove" method in some cases. For example, we want to make a simple animation of text being typed out, such as this one:
Note that the first frame starts with the letter "I" and ends with a blank frame of ½ second duration...
Most folks would add the text with the Text tool, then use the "Split text" function, then Distribute to Frames. As would I. But that's where the similarity ends. The other folks would then be manually adding the appropriate letters to frames, as this is what you will see after doing the above steps:
Instead of clicking the little "eye" button to add the letters to the frames, the far easier way to do this is to change the removal method for all the frames to "Do Not Remove." The one exception is the second-last frame, the one with all the text now showing. We set that frame's removal method as "To Background," because the last frame in the animation is a blank frame. If we leave it as "Do Not Remove," then it's not removed, and the last frame is not blank as we want it to be.
Try doing your own version of Example 2...
- Open GIF Animator 5 and click the "New"
 button. Choose whatever canvas size you want.
- Select the Text Tool
 from the Tool Panel. Click in your workspace and enter whatever text you want.
 With the text object still highlighted in the Object Manager, go to the Standard Toolbar and click "Edit" and select "Crop Canvas."
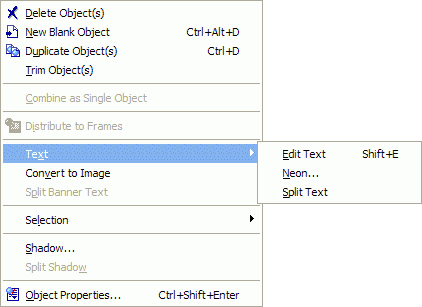
- Right-click on the text object in the Object Manager, mouse down to "Text" and select "Split Text."
- You will now have many text objects in the Object Manager. While they are all still selected, click the "Distribute To Frames"
 button in the Standard Toolbar.
- Frame 1 will be selected in the Frame Panel. Scroll to the last frame and click on it to select it. Now click the "Add Frame"
 button. This last frame we're leaving blank.
- Scroll to Frame 1 of the animation, hold the SHIFT key on your keyboard, and click on Frame 1 with your mouse. All frames should now be selected.
- In the Standard Toolbar, click "Frame" and select "Frame Properties." Change the Removal Method to "Do Not Remove."
- Now select just the second-last frame of your animation. Open the Frame Properties of this frame and select "To Background" as the Removal Method. Set the Frame Delay of the last frame to 200 or so.
- Click the Preview tab in the Workspace to see the finished result. It should be playing like the one below.

- Optimize and save as a GIF. We're done!
Now that you're armed with that extra bit of information, what can you think of to take advantage of the Frame Removal Method? Footprints walking in the sand? An animated progress bar? Hmmm...
I hope you enjoyed this tutorial and learned something from it. Happy Animating!
For my tutorial on Ulead GIF Animator 5's basics, click the following banner...
![]()
![]()
