
Standard Toolbar | Ulead GIF Animator 5 Basics
Ulead GIF Animator 5's Standard Toolbar has the basic stuff... File, edit, view, and help. Then there's the GIF specific things, object and frame. The bells and whistles follow with filter and video F/X. (We'll get into the bells and whistles in another tutorial. This tutorial is for the basics.)
Below that are the icons: New, open, save, add image, add video, favourite image editor, undo, redo, cut, copy, paste, canvas size, global information, etc. Hold the cursor over the icon and a tool tip will appear and tell you what it is (not on this page, but when you're using UGA 5).

![]() Things like new, open, and save are common to almost all software. New starts
a fresh blank image, which you can start adding images to.
Things like new, open, and save are common to almost all software. New starts
a fresh blank image, which you can start adding images to.
New opens the dialogue box below. From here, select a preset size, or enter your own values. You can choose a colored background, or a transparent one. I always select transparent - if one wants a colored background, you can add a new object and color it later.

Open will open an existing image file. Just click the Folder icon or select "Open Image..." to open these file types: GIF, BMP, EPS, IFF, IMG, JPG, MAC, MSP, PCD, PCT, PCX, PNG, PSD, PSP, TGA, UFO or UGA.
The drop down menu gives these options for Open: "Image...", UGA (Ulead GIF Animator), UFO (Ulead File for Objects, used by Ulead PhotoImpact and UGA 5), PSD (Photoshop), PSP (Paint Shop Pro), or "Video..." files. If you select to open Video files, then GIF Animator 5 is expecting this file type to be selected. It may give an error if you select a file that is not a supported video file type. (See also "Add Image" and "Add Video" just below).
Save - UGA 5 will let you save in GIF, UGA, UFO, or PSD formats. You can also save as image files, which will save either the selected frame or all frames in JPEG or PNG format. There is also the option to save "As Video File..." in these formats: AVI, FLC, FLI, FLX, MOV, QT and MPG. Lastly, you can save your animation as a Macromedia® Flash (SWF) file with BMP or JPEG compression. However, as Adobe has stopped supporting Flash, this option is not a good idea...
It is highly recommended to first save your work as a UGA file, as this format retains all the objects and frame information, and makes editing later much easier.
![]() Add image
will add an image object to your animation. This is for adding an image you
already have on your computer. You have the option of adding it to just the
current frame (the frame selected in the Frame Panel) or inserting it as a new frame.
As noted above, many file types are supported. You can add more than once image from a folder at a time, using CTRL+click or SHIFT+click.
Note that if you are using the option "Insert as new frames" you should first select the image you want in the last frame, and work backwards.
Add image
will add an image object to your animation. This is for adding an image you
already have on your computer. You have the option of adding it to just the
current frame (the frame selected in the Frame Panel) or inserting it as a new frame.
As noted above, many file types are supported. You can add more than once image from a folder at a time, using CTRL+click or SHIFT+click.
Note that if you are using the option "Insert as new frames" you should first select the image you want in the last frame, and work backwards.

![]() Add video
will let you insert a video file as individual frames. You can add all or just
a short clip of the video. Supported file types are Microsoft AVI (.avi),
AutoDesk Animation files (.flc, .fli, .flx), Quick Time movies (.mov or .qt),
or MPEG (.mpg, .mpeg, .mpv, .dat, .mp2). Clicking the Duration button will let
you select the start and end frames you desire. Warning: Be careful how many
frames you insert! If you're using an older, slower PC, this could take a long
time and really slow your computer down considerably. I know this from
experience...
Add video
will let you insert a video file as individual frames. You can add all or just
a short clip of the video. Supported file types are Microsoft AVI (.avi),
AutoDesk Animation files (.flc, .fli, .flx), Quick Time movies (.mov or .qt),
or MPEG (.mpg, .mpeg, .mpv, .dat, .mp2). Clicking the Duration button will let
you select the start and end frames you desire. Warning: Be careful how many
frames you insert! If you're using an older, slower PC, this could take a long
time and really slow your computer down considerably. I know this from
experience...
How to import an unsupported video format
Ulead GIF Animator 5 is old software. Hence, there are video formats you cannot import into GA 5 with the "Open Video" or "Add Video" commands. There are also video codecs (short for compressor-decompressor) that are incompatible with GA 5. However, with the help of my favorite graphic viewing software, IrfanView, we can do it. IrfanView can play a large variety of video formats, and you can export the video frames in BMP (bitmap) format, which GA 5 will happily import as indvidual frames. The latest version of IrfanView, 4.52, can now export flv files, but only the 64-bit version.
Open the video with IrfanView. Then click Options, Extract all frames... Select the folder you want to save the bmp files in. It's best to create a new folder for this purpose. You can select the start frame and end frame at the bottom of the dialogue box, if you only want to select part of a video. You can estimate this using the information on this box - it lists the Frames per second, and total frames. So if your video has a frame rate of 20 frames per second, and you want to start importing at 5 seconds in, then set the start frame at 20 x 5, or 100.
Once you have all the frames saved, it's time to import them into Ulead GIF Animator 5. Open GA 5, and click the Add Image ![]() button.
button.
You will want to adjust the frame delay from the default of 0.1 second (10 frames per second) to the frame rate of the video you imported. For example, if the video frame rate is 20 fps (frames per second), then the frame delay for each frame should be 0.05.
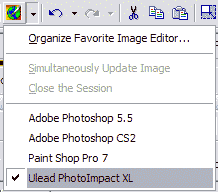
![]() Favorite Image Editor will
let you edit your individual objects in any program (which must be already
installed on your computer!) that supports .psd (Adobe Photoshop, Adobe
PhotoDeluxe or JASC Paint Shop Pro) or .ufo (Ulead PhotoImpact) formats. The
icon shown here depends on which image editor you used last. If you haven't
configured this yet, it will be blank. To add image editors, click on the
down-arrow beside the icon and select Organize Favorite Image Editor. You can add,
delete or edit your image editors here by typing in the name of the program
and then browsing to find it's .exe file.
Favorite Image Editor will
let you edit your individual objects in any program (which must be already
installed on your computer!) that supports .psd (Adobe Photoshop, Adobe
PhotoDeluxe or JASC Paint Shop Pro) or .ufo (Ulead PhotoImpact) formats. The
icon shown here depends on which image editor you used last. If you haven't
configured this yet, it will be blank. To add image editors, click on the
down-arrow beside the icon and select Organize Favorite Image Editor. You can add,
delete or edit your image editors here by typing in the name of the program
and then browsing to find it's .exe file.
When you open the external image editor, you will notice that not all objects will be visible in the composite image. Whatever objects are visible in the frame that's selected in GIF Animator 5 are the ones that are visible here. You can change the visibility in the external editor if you like.
Once you are done editing, just save the image within the image editor and GIF Animator will pop up again.
For further information, see the Replacing Objects tutorial.
![]() Undo and Redo are standard buttons for most software. UGA 5 has up to 50 levels of undo
and redo, so if you really mess up, you can click here to go back to just
before you messed up. Very handy... I've used it many times myself!
Undo and Redo are standard buttons for most software. UGA 5 has up to 50 levels of undo
and redo, so if you really mess up, you can click here to go back to just
before you messed up. Very handy... I've used it many times myself!
![]() Cut, copy and paste. We've all seen these before. However, when working with the
text tool, if you want to copy and paste text from another program, you must paste using the keyboard shortcut "Ctrl V" to paste text into the text
dialog box (see the Tools & Attributes page). If you want to copy text from the text dialog box, use the keyboard shortcut "Ctrl C."
Cut, copy and paste. We've all seen these before. However, when working with the
text tool, if you want to copy and paste text from another program, you must paste using the keyboard shortcut "Ctrl V" to paste text into the text
dialog box (see the Tools & Attributes page). If you want to copy text from the text dialog box, use the keyboard shortcut "Ctrl C."
![]() Canvas size sets the overall dimensions of your animation in pixels. A useful button.
If you have imported an image file that is bigger than your original canvas
size, here is where to fix it. Look at the object manager panel to see the
size of your largest object, and put those values here.
Canvas size sets the overall dimensions of your animation in pixels. A useful button.
If you have imported an image file that is bigger than your original canvas
size, here is where to fix it. Look at the object manager panel to see the
size of your largest object, and put those values here.
![]() Global information lets you set the animation as having either
infinite looping, or a set number of loops. If you set looping at 5, the
animation will play 5 times and stop at the last frame.
Global information lets you set the animation as having either
infinite looping, or a set number of loops. If you set looping at 5, the
animation will play 5 times and stop at the last frame.
A comment can also be added here. Some animators will put their credit here, such as "This animated gif was made by Elmer Fudd with Ulead GIF Animator 5" or the like. Further information on comment blocks is found in the Optimization section of the Workspace.

![]() Distribute to frames. When you select two or more
objects on the Object Manager panel (we're getting to that) this button
becomes active. When you press it, the bottom-most object you selected goes to
the frame you have highlighted; the object up from that goes to the next frame
to the right, and so on. If you have only one frame or have selected the last
frame, new frames will be created for the objects. If you had made all your
frames in another program and imported them as objects, this would easily
convert them to frames.
Distribute to frames. When you select two or more
objects on the Object Manager panel (we're getting to that) this button
becomes active. When you press it, the bottom-most object you selected goes to
the frame you have highlighted; the object up from that goes to the next frame
to the right, and so on. If you have only one frame or have selected the last
frame, new frames will be created for the objects. If you had made all your
frames in another program and imported them as objects, this would easily
convert them to frames.
![]() Synchronize Objects Across Frames. This lets you take
one or more objects in a specific frame of your choice and add them to one or
more other frames, in the same location as your source frame. Thus the term
synchronize. This is a very handy function. For example, let's say you have an
18 frame animation, and you want an object to be visible and in the same
location in all frames. Instead of clicking on each frame, one by one, and
adding and positioning the image, you would use this feature and do it much
quicker and more efficiently. You would add and position the object in one
frame, then use this button to make it visible to all frames. Play with this
feature and get familiar with it - it will become a good friend!
Synchronize Objects Across Frames. This lets you take
one or more objects in a specific frame of your choice and add them to one or
more other frames, in the same location as your source frame. Thus the term
synchronize. This is a very handy function. For example, let's say you have an
18 frame animation, and you want an object to be visible and in the same
location in all frames. Instead of clicking on each frame, one by one, and
adding and positioning the image, you would use this feature and do it much
quicker and more efficiently. You would add and position the object in one
frame, then use this button to make it visible to all frames. Play with this
feature and get familiar with it - it will become a good friend!
Before you click the button, hold down your Ctrl key and click on all the objects you want to synchronize. Then hold down the Ctrl key and click on the frames you want the object(s) synchronized on, then your source frame. Then click the Synchronize button. When you click on it, the following pops up:
 As you see, this lets you select from several
options. First, select the frame that contains the source image you want to synchronize from the drop-down menu. Select either all objects or active
objects. (Active Objects are objects that are highlighted in the Object Manager panel.) Then select what object attributes
you want to copy to the other frames. Finally, select which frames you want: all or just the ones you previously highlighted. Click "OK" and you're done.
As you see, this lets you select from several
options. First, select the frame that contains the source image you want to synchronize from the drop-down menu. Select either all objects or active
objects. (Active Objects are objects that are highlighted in the Object Manager panel.) Then select what object attributes
you want to copy to the other frames. Finally, select which frames you want: all or just the ones you previously highlighted. Click "OK" and you're done.
In brief form:
- Select source image Select the source frame from the drop-down menu.
- Objects to synchronize Select to synchronize all the objects or only those selected.
- Apply the following attributes
- X-offset Synchronize the horizontal position of the objects.
- Y-offset Synchronize the vertical position of the objects.
- Transparency Synchronize the transparency of the objects.
- Visibility Synchronize the visibility of the objects
- Lock Synchronize the position lock attribute of the objects.
- Merge mode Synchronize the composite characteristics of the objects.
- Apply to Apply the synchronization to all frames or only those selected.
![]() Flatten Frames As Single Object. This will take all the objects in the frame (or
frames) you've selected and turn them into a new object (or objects if you selected more than one frame). Your original objects remain untouched, you've
just combined them to make a new single object. Try it out and see.
Flatten Frames As Single Object. This will take all the objects in the frame (or
frames) you've selected and turn them into a new object (or objects if you selected more than one frame). Your original objects remain untouched, you've
just combined them to make a new single object. Try it out and see.
![]() Preview in... and Help. These will let you preview your animation in Internet Explorer, Netscape
(remember Netscape?), or other browser you may have. UGA 5 will automatically detect Internet Explorer and older versions of Netscape. If you have another browser, you can add this in the
Preferences found by clicking "File."
Preview in... and Help. These will let you preview your animation in Internet Explorer, Netscape
(remember Netscape?), or other browser you may have. UGA 5 will automatically detect Internet Explorer and older versions of Netscape. If you have another browser, you can add this in the
Preferences found by clicking "File."
Only one browser in addition to Internet Explorer (IE) and Netscape can be added. If you have more installed, you'll have to go here to change it to view it in the other(s).

If you don't have Netscape installed (these days, who does?) but have two other browsers in addition to IE, you can uncheck the auto-detect option and manually browse to another browser, as shown in the image to the right. The Netscape icon will still be there, but in this example, Opera will open instead.

Of course, you can also substitute another browser in place of Internet Explorer - in the example image below, I've replaced IE with MS Edge, and Netscape with Firefox.

Using the Preview in Browser will let you see how your animation will look on the web, and let you see how different browsers may handle it.
The last one is Help. Don't be embarrassed to click here. It's there to be used when you're confused. Or come back here and read these tutorials!


![]()
![]()
![]()