Object Manager | Ulead GIF Animator 5 Basics

Ulead GIF Animator 5's Object Manager Panel is fairly straightforward. There are only a few buttons and things here, but it is a very important part of GIF Animator 5.
Selected (or Active) objects appear highlighted. The example to the right shows the active (currently selected) object highlighted blue. (The color is dependent on your Windows settings.) To select more than one, hold the CTRL key and click each additional object you wish to select. If you want to select all objects, click the top object, then hold SHIFT and click the very bottom object; all objects in between will also be selected.
There are three "boxes" beside the thumbnail of the object. The first is for Visibility (on or off), the second is for the "lock" (locked in position or not) and the third is the object type (detailed later on this page). The text to the right of that shows the object name, if you have given it one, otherwise a number based on the order it was created. Below that is the position of the object in the frame selected, in x-y co-ordinates; then the object's dimensions in pixels.
![]() Visible Objects
(objects that are present in the currently selected frame, such as shown below)
have the little eye picture showing to the right of the thumbnail. Click in
this box to make an object visible or not visible in the frame. If the eye is
not there, the object is not visible in that frame.
Visible Objects
(objects that are present in the currently selected frame, such as shown below)
have the little eye picture showing to the right of the thumbnail. Click in
this box to make an object visible or not visible in the frame. If the eye is
not there, the object is not visible in that frame.

An important thing to know about Objects is that they are like a stack of papers - the one on the top keeps you from seeing the ones underneath. The object at the top of the Object Manager Panel is the one on top of all other objects. If you change the order of any of the objects within the Object Manager itself, this will affect all the frames in the animation.
Note that you can click and drag an object up or down on the Object Manager. The objects on the panel are displayed as they appear - the topmost will overlap any others when visible in a frame. If you want an object as a background, move it to the bottom. See also the description of the Pick Tool on the Tools & Attributes page.
One could compare this to traditional animation, where artists painted on "cells" that are basically transparent sheets. There is one for the background (bottom) and various other ones for the rest of the scene. A Flintstones scene with Fred and Barney in the car would have the background (scenery), Fred, Barney, and the car. The cells are positioned for a frame, and they take a picture of that. Then some cells may be removed or new ones added, and things moved a bit for the next frame, and so on. The background is always on the bottom, otherwise we wouldn't see Fred and Barney...
 The
Object Manager screen shot at the upper right is for a globe animation I made. On this image, there
are various globe faces. Only one that you can see here is visible. But there
are three objects visible in each frame... You have to scroll down on the
Object Manager to see the other visible ones. Or, you can change the view by
clicking the drop-down menu under "Show Objects" and changing that to "Visible
Only" to get a better look at things.
 On this view, you
see only the objects that are used in Frame 1 (the frame currently selected in
the Frame Panel). This can be a useful view on occasion.
If we select a different frame in the Frame Panel, the objects showing here will change to the ones in that newly selected frame. In this animation, there are twelve globe "fronts" and twelve globe "backs" plus the helmet. All the globe backs are below the helmet, all the globe fronts are above the helmet. Thus the helmet always appears to be in the "middle" of the animation.
![]() The next space is to lock or unlock an object's position in the frame.
Click in this box to try it out. This prevents accidental moving of an object.
The next space is to lock or unlock an object's position in the frame.
Click in this box to try it out. This prevents accidental moving of an object.
The image to the right of that shows the type of object: image
![]() , text
, text
![]() ,
banner text
,
banner text
![]() or path
or path
![]() . Path objects cannot be created in GA 5, but can be imported
from UFO format files that contain path objects. Ulead's PhotoImpact uses the
UFO format.
. Path objects cannot be created in GA 5, but can be imported
from UFO format files that contain path objects. Ulead's PhotoImpact uses the
UFO format.
Finally there is the object name (Obj - 6, for example), position on the x-y axis in pixels (5,5), and the object's size in pixels (W:90,H:90). Note that the position is dependant on the frame selected.
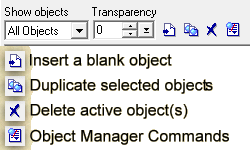
There are several tools at the top of the panel:
- The drop down box under "Show Objects" lets you show either all objects, or only objects visible in the frame selected in the Frame Panel.

- The Transparency control lets you adjust the opacity of the object (or objects) selected on the Object Manager Panel. Note that when you adjust an objects transparency, it applies only to the frame you have selected in the Frame Panel. If you want an object's transparency to be the same in all frames, use the Synchronize Objects button in the standard toolbar.
- The four buttons at the top right are: Insert a blank object, Duplicate
selected object(s), Delete active object(s), and Object Manager Commands.
- The Insert button gives you a blank object. Grab your tools and paint away!
- The Duplicate button makes another copy of that object, positioned exactly as the original. You can now move or edit it as you see fit.
- Delete... well, that one's obvious. If you delete an object, it is gone entirely from all the frames it was in. If you need to get that object back, you have to use the Undo button, which has a maximum of 50 steps back.
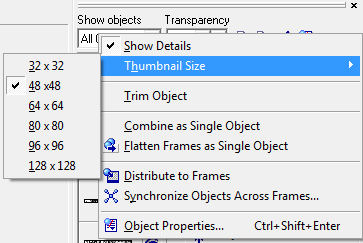
- The Object Manager Commands button opens a dialog box that lets you do
several things:
- Show Details - this toggles the visibility of the x-y axis and object size.

- Let you set the thumbnail size in the Object Manager Panel.
- Trim the object (gets rid of empty transparent space around the object).
- Combine two or more selected objects as one object - this makes one new object, the original individual objects are combined. If you want to retain them, then duplicate them first before combining them.
- Flatten Frame as a single object, Distribute to Frames, or Synchronize Objects Across Frames (all described in Standard Toolbar).
- Open the Object Properties dialog box.
- Show Details - this toggles the visibility of the x-y axis and object size.
The Object Properties box lets you select the position, size, transparency, or name of the object. You can also add a shadow effect here. Try it out and see what things do.
The Merge function will be familiar to those who use
programs like Photoshop. There are many options here to choose from, but in
most cases you will leave it set at "Always." Note that some interesting
effects can be done with this... Changing this value affects only the frame
selected.
Note: The Merge feature is present in GIF Animator 5 versions that come
with PhotoImpact. Stand-alone versions seem to be lacking this feature.
Transparency is also frame-dependant. This adjusts the opacity of the object in the frame selected.


The Position value is dependant on the frame selected. Changing the size here will affect all frames, so duplicate the object first if you want to retain the orginal size in other frames. To prevent distorting the image when you resize, put a checkmark in "Keep aspect ratio." You can also change the Unit from "Pixels" to "Percent" if you want to change the size by a percentage.

To use the Shadow, click in the check box and click the options button to adjust the settings. You can change the shadow color by clicking the color area (the black square on this example). Select the type of shadow by clicking one of the various presets. Adding a shadow to an object affects all frames.
Experiment with the Shadow settings - it's the best way to get the feel for what you can do. If the Preview is checked, you can see the shadow change in the workspace as you tweak the settings.

![]()

